> ## Documentation Index
> Fetch the complete documentation index at: https://forest-chore-open-api.mintlify.site/llms.txt
> Use this file to discover all available pages before exploring further.
# Enrich your models
> ⚠️ This page is relevant only if you installed Forest directly on a database (SQL/Mongodb). If you installed in a Rails/Django/Laravel app, you manage your models like you normally would.
### Declaring a new model
Whenever you have a new table/collection in your database, you will have to create file to declare it. Here is a **template example** for a `companies` table:
```javascript theme={null}
module.exports = (sequelize, DataTypes) => {
const { Sequelize } = sequelize;
const Company = sequelize.define('companies', {
name: {
type: DataTypes.STRING,
},
createdAt: {
type: DataTypes.DATE,
},
...
}, {
tableName: 'companies',
underscored: true,
schema: process.env.DATABASE_SCHEMA,
});
Company.associate = (models) => {
};
return Company;
};
```
**Fields** within that model should match your table's fields as shown in next section.
New **relationships** may be added there:
```javascript theme={null}
Company.associate = (models) => {};
```
You can learn more about relationships on this [dedicated page](/legacy/javascript-agents/reference-guide/models/relationships/overview).
```javascript theme={null}
module.exports = (mongoose, Mongoose) => {
const schema = Mongoose.Schema({
'name': String,
'createdAt': Date,
...
}, {
timestamps: false,
});
return mongoose.model('companies', schema, 'companies');
};
```
**Fields** within that model should match your collection's fields as shown in next section.
New **relationships** are to be added as properties:
```javascript theme={null}
'orders': [{ type: mongoose.Schema.Types.ObjectId, ref: 'orders' }],
'customer_id': { type: mongoose.Schema.Types.ObjectId, ref: 'customers' },
```
You can learn more about relationships on this [dedicated page](/legacy/javascript-agents/reference-guide/models/relationships/overview).
When you manually add a new model, you need to configure the permissions for the corresponding collection in the UI (allow record details view, record creation, record edit, etc). By default a new collection is not visible and all permissions are disabled. You can set permissions by going to the [Roles settings](https://docs.forestadmin.com/user-guide/project-settings/teams-and-users/manage-roles).
### Declaring a new field in a model
Any new field must be added **manually** within the corresponding model of your `/models` folder.
Fields are declared as follows:
```javascript theme={null}
createdAt: {
type: DataTypes.DATE,
},
```
An exhaustive list of **DataTypes** can be found in [Sequelize documentation](https://sequelize.org/master/manual/data-types.html).
You can see how that snippet fits into your code in the [model example](/legacy/javascript-agents/reference-guide/models/enrich-your-models#declaring-a-new-model) above.
Fields are declared as follows:
```javascript theme={null}
'createdAt': Date,
```
An exhaustive list of **SchemaTypes** can be found in [Mongoose documentation](https://mongoosejs.com/docs/schematypes.html#what-is-a-schematype).
You can see how that snippet fits into your code in the [model example](/legacy/javascript-agents/reference-guide/models/enrich-your-models#declaring-a-new-model) above.
### Managing nested documents in Mongoose
For a better user experience, flatten nested fields. In v2 see the [Flattener plugin](/product/process/advanced-concepts/plugins/overview).
Lumber introspects your data structure recursively, so ***nested fields*** (object in object) are detected any level deep. Your **sub-documents** (array of nested fields) are detected as well.
Conflicting data types will result in the generation of a [mixed](https://mongoosejs.com/docs/schematypes.html#mixed) type field.
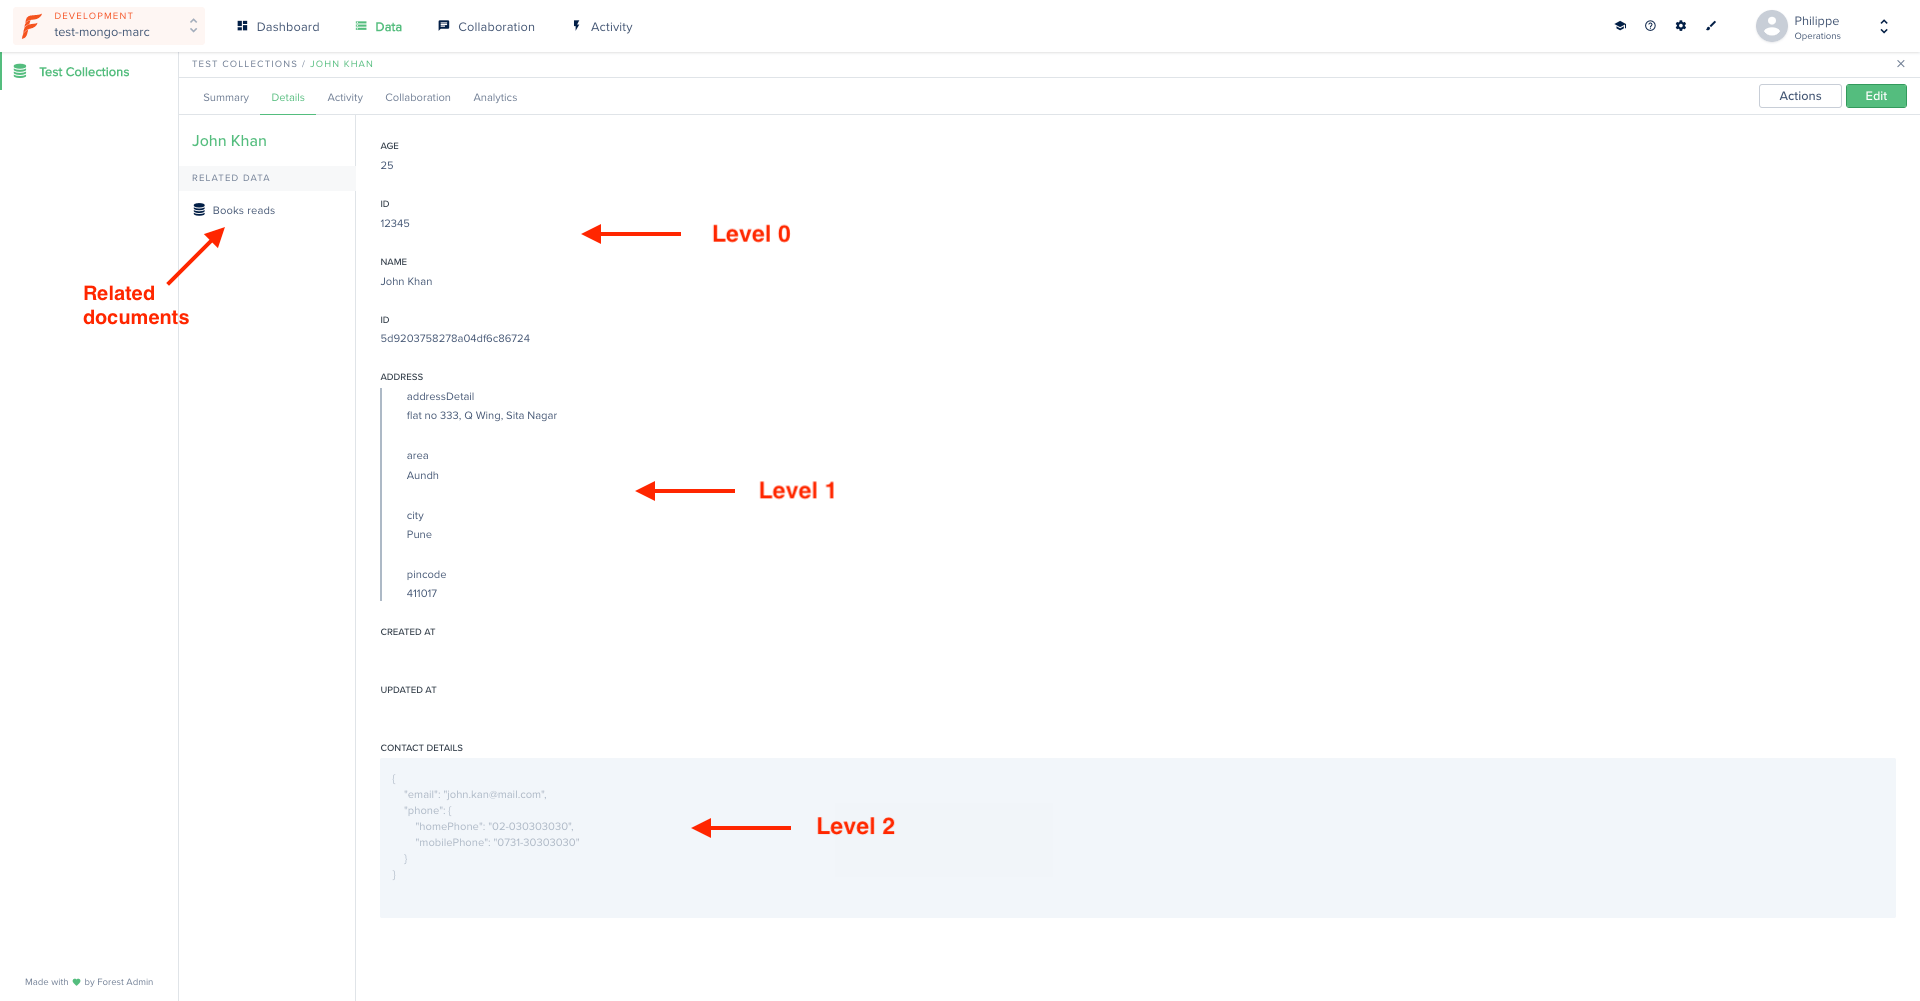
The following model...
```javascript theme={null}
module.exports = (mongoose, Mongoose) => {
const schema = Mongoose.Schema({
// Level 0
'age': Number,
'id': Number,
'name': String,
// Level 1
'address':{
'addressDetail': String,
'area': String,
'city': String,
'pincode': Number,
},
// Level 2
'contactDetails':{
'phone':{
'homePhone': String,
'mobilePhone': String,
},
'email': String,
},
// Related data
'booksRead':[{
'name': String,
'authorName': String,
'publishedBy': String,
}],
}, {
timestamps: false,
});
return mongoose.model('testCollection', schema, 'testCollection');
};
```
...will result in the following interface:
 ### Removing a model
By default **all** tables/collections in your database are analyzed by Lumber to generate your models. If you want to exclude some of them to prevent them from appearing in your Forest, check out [this how-to](/legacy/javascript-agents/how-tos/settings/include-exclude-models).
### Adding validation to your models
Validation allows you to keep control over your data's quality and integrity.
If your existing app already has validation conditions, you may - or may not - want to reproduce the same validation conditions in your admin backend's models.
If so, you'll have to do it **manually**, using the below examples.
Depending on your database type, your models will have been generated in *Sequelize* (for SQL databases) or *Mongoose* (for Mongo databases).
In Sequelize, you add validation using the `validate` property:
```javascript theme={null}
module.exports = (sequelize, DataTypes) => {
const Customer = sequelize.define('customers', {
...
'email': {
type: DataTypes.STRING,
validate: {
isEmail: true,
len: [10,25]
}
},
...
},
...
return Customer;
};
```
The 2 validators above will have the following effect on your email field:
### Removing a model
By default **all** tables/collections in your database are analyzed by Lumber to generate your models. If you want to exclude some of them to prevent them from appearing in your Forest, check out [this how-to](/legacy/javascript-agents/how-tos/settings/include-exclude-models).
### Adding validation to your models
Validation allows you to keep control over your data's quality and integrity.
If your existing app already has validation conditions, you may - or may not - want to reproduce the same validation conditions in your admin backend's models.
If so, you'll have to do it **manually**, using the below examples.
Depending on your database type, your models will have been generated in *Sequelize* (for SQL databases) or *Mongoose* (for Mongo databases).
In Sequelize, you add validation using the `validate` property:
```javascript theme={null}
module.exports = (sequelize, DataTypes) => {
const Customer = sequelize.define('customers', {
...
'email': {
type: DataTypes.STRING,
validate: {
isEmail: true,
len: [10,25]
}
},
...
},
...
return Customer;
};
```
The 2 validators above will have the following effect on your email field:
.png?fit=max&auto=format&n=l9oWVTFSA2iV8NAX&q=85&s=4bb8d8968a64bee216db06e8b9095b31)
.png?fit=max&auto=format&n=l9oWVTFSA2iV8NAX&q=85&s=de99ad76049fc7b3f934a3745acb5f15) For an exhaustive list of available validators, check out the [Sequelize documentation](https://sequelize.org/master/manual/models-definition.html#validations).
In Mongoose, you add validators alongside the `type` property:
```javascript theme={null}
module.exports = (mongoose, Mongoose) => {
const schema = Mongoose.Schema({
'createdAt': Date,
'email': {
'type': String,
'minlength': 10,
'maxlength': 25
},
'firstname': String,
...
}
return mongoose.model('customer', schema, 'customer');
};
```
This is the effect on your field:
For an exhaustive list of available validators, check out the [Sequelize documentation](https://sequelize.org/master/manual/models-definition.html#validations).
In Mongoose, you add validators alongside the `type` property:
```javascript theme={null}
module.exports = (mongoose, Mongoose) => {
const schema = Mongoose.Schema({
'createdAt': Date,
'email': {
'type': String,
'minlength': 10,
'maxlength': 25
},
'firstname': String,
...
}
return mongoose.model('customer', schema, 'customer');
};
```
This is the effect on your field:
.png?fit=max&auto=format&n=l9oWVTFSA2iV8NAX&q=85&s=16ea1ee9eef90e14638e2c499dc10c88) Mongoose has no build-in validators to check whether a string is an email. Should you want to validate that a content is an email, you have several solutions:
```javascript theme={null}
module.exports = (mongoose, Mongoose) => {
const schema = Mongoose.Schema({
'createdAt': Date,
'email': {
'type': String,
'match': [/^\w+([\.-]?\w+)*@\w+([\.-]?\w+)*(\.\w{2,3})+$/, 'Invalid email']
},
'firstname': String,
...
}
return mongoose.model('customer', schema, 'customer');
};
```
A better yet solution would be to rely on an external library called [validator.js](https://www.npmjs.com/package/validator) which provides many [build-in validators](https://www.npmjs.com/package/validator#validators):
```javascript theme={null}
import { isEmail } from 'validator';
module.exports = (mongoose, Mongoose) => {
const schema = Mongoose.Schema({
'createdAt': Date,
'email': {
'type': String,
'validate': [isEmail, 'Invalid email']
},
'firstname': String,
...
}
return mongoose.model('customer', schema, 'customer');
};
```
You then that any invalid email is refused:
Mongoose has no build-in validators to check whether a string is an email. Should you want to validate that a content is an email, you have several solutions:
```javascript theme={null}
module.exports = (mongoose, Mongoose) => {
const schema = Mongoose.Schema({
'createdAt': Date,
'email': {
'type': String,
'match': [/^\w+([\.-]?\w+)*@\w+([\.-]?\w+)*(\.\w{2,3})+$/, 'Invalid email']
},
'firstname': String,
...
}
return mongoose.model('customer', schema, 'customer');
};
```
A better yet solution would be to rely on an external library called [validator.js](https://www.npmjs.com/package/validator) which provides many [build-in validators](https://www.npmjs.com/package/validator#validators):
```javascript theme={null}
import { isEmail } from 'validator';
module.exports = (mongoose, Mongoose) => {
const schema = Mongoose.Schema({
'createdAt': Date,
'email': {
'type': String,
'validate': [isEmail, 'Invalid email']
},
'firstname': String,
...
}
return mongoose.model('customer', schema, 'customer');
};
```
You then that any invalid email is refused:
.png?fit=max&auto=format&n=l9oWVTFSA2iV8NAX&q=85&s=0d32674b9f54c4902e0954c0f2f723f8) For further details on validators in Mongoose, check out the [Mongoose documentation](https://mongoosejs.com/docs/validation.html#built-in-validators).
###
### Adding a default value to your models
You can choose to add a default value for some fields in your models. As a result, the corresponding fields will be prefilled with their default value in the creation form:
```javascript theme={null}
module.exports = (sequelize, DataTypes) => {
const Customer = sequelize.define('customers', {
...
'firstname': {
'type': DataTypes.STRING,
'defaultValue': 'Marc'
},
...
},
...
return Customer;
};
```
```javascript theme={null}
module.exports = (mongoose, Mongoose) => {
const schema = Mongoose.Schema({
'createdAt': Date,
'email': {
'type': String,
'default': 'Marc'
},
'firstname': String,
...
}
return mongoose.model('customer', schema, 'customer');
};
```
For further details on validators in Mongoose, check out the [Mongoose documentation](https://mongoosejs.com/docs/validation.html#built-in-validators).
###
### Adding a default value to your models
You can choose to add a default value for some fields in your models. As a result, the corresponding fields will be prefilled with their default value in the creation form:
```javascript theme={null}
module.exports = (sequelize, DataTypes) => {
const Customer = sequelize.define('customers', {
...
'firstname': {
'type': DataTypes.STRING,
'defaultValue': 'Marc'
},
...
},
...
return Customer;
};
```
```javascript theme={null}
module.exports = (mongoose, Mongoose) => {
const schema = Mongoose.Schema({
'createdAt': Date,
'email': {
'type': String,
'default': 'Marc'
},
'firstname': String,
...
}
return mongoose.model('customer', schema, 'customer');
};
```
.png?fit=max&auto=format&n=l9oWVTFSA2iV8NAX&q=85&s=a9bc53bcee3614b4d51306d017833bf0) ### Adding a hook
Hooks are a powerful mechanism which allow you to automatically **trigger an event** at specific moments in your records lifecycle.
In our case, let's pretend we want to update a `update_count` field every time a record is updated:
To add a `beforeSave` hook in Sequelize, use the following syntax:
```javascript theme={null}
module.exports = (sequelize, DataTypes) => {
var Order = sequelize.define('orders', {
...
'update_count': {
'type': DataTypes.INTEGER,
'defaultValue': 0
},
...
},
...
Order.beforeSave((order, options) => {
order.update_count += 1;
}
);
return Order;
};
```
Every time the order is updated, the updateCount field will be incremented by 1:
### Adding a hook
Hooks are a powerful mechanism which allow you to automatically **trigger an event** at specific moments in your records lifecycle.
In our case, let's pretend we want to update a `update_count` field every time a record is updated:
To add a `beforeSave` hook in Sequelize, use the following syntax:
```javascript theme={null}
module.exports = (sequelize, DataTypes) => {
var Order = sequelize.define('orders', {
...
'update_count': {
'type': DataTypes.INTEGER,
'defaultValue': 0
},
...
},
...
Order.beforeSave((order, options) => {
order.update_count += 1;
}
);
return Order;
};
```
Every time the order is updated, the updateCount field will be incremented by 1:
 The exhaustive list of available hooks in Sequelize are available [here](https://sequelize.org/master/manual/hooks.html).
To add a hook in Mongoose on `save` event, you may use the following snippet:
```javascript theme={null}
module.exports = (mongoose, Mongoose) => {
const schema = Mongoose.Schema({
'update_count': {
'type': Number,
'default': 0
},
...
}
schema.pre('save', async function() {
const newCount = this.update_count + 1;
const incrementCount = () => {
this.set('update_count', newCount);
};
await incrementCount();
});
return mongoose.model('order', schema, 'order');
};
```
As mentioned in [their documentation](https://mongoosejs.com/docs/middleware.html#notes)
*Pre and post `save()` hooks are **not** executed on `update()`, `findOneAndUpdate()`, etc.*
This would only work if you specifically call `save` in your update method.
The exhaustive list of available hooks in Sequelize are available [here](https://sequelize.org/master/manual/hooks.html).
To add a hook in Mongoose on `save` event, you may use the following snippet:
```javascript theme={null}
module.exports = (mongoose, Mongoose) => {
const schema = Mongoose.Schema({
'update_count': {
'type': Number,
'default': 0
},
...
}
schema.pre('save', async function() {
const newCount = this.update_count + 1;
const incrementCount = () => {
this.set('update_count', newCount);
};
await incrementCount();
});
return mongoose.model('order', schema, 'order');
};
```
As mentioned in [their documentation](https://mongoosejs.com/docs/middleware.html#notes)
*Pre and post `save()` hooks are **not** executed on `update()`, `findOneAndUpdate()`, etc.*
This would only work if you specifically call `save` in your update method.