> ## Documentation Index
> Fetch the complete documentation index at: https://forest-chore-open-api.mintlify.site/llms.txt
> Use this file to discover all available pages before exploring further.

# Create and manage Smart Actions

### What is a Smart Action?

Sooner or later, you will need to perform actions on your data that are specific to your business. Moderating comments, generating an invoice, logging into a customer’s account or banning a user are exactly the kind of important tasks to unlock in order to manage your day-to-day operations.

On our Live Demo example, our `companies` collection has many examples of Smart Action. The simplest one is `Mark as live`.

<Info>
  If you're looking for information on native actions (CRUD), check out [this page](/legacy/javascript-agents/reference-guide/actions/overview).
</Info>

### Creating a Smart action

In order to create a Smart action, you will first need to **declare it in your code** for a specific collection. Here we declare a *Mark as Live* Smart action for the `companies` collection.

<Tabs>
  <Tab title="SQL">
    ```javascript theme={null}
    const { collection } = require('forest-express-sequelize');

    collection('companies', {
      actions: [
        {
          name: 'Mark as Live',
        },
      ],
    });
    ```
  </Tab>

  <Tab title="Mongoose">
    ```javascript theme={null}
    const { collection } = require('forest-express-mongoose');

    collection('companies', {
      actions: [
        {
          name: 'Mark as Live',
        },
      ],
    });
    ```
  </Tab>
</Tabs>

#### req.user

```javascript theme={null}
req.user content example

{
  "id": "172",
  "email": "angelicabengtsson@doha2019.com",
  "firstName": "Angelica",
  "lastName": "Bengtsson",
  "team": "Pole Vault",
  "role": "Manager",
  "tags": [{ key: "country", value: "Canada" }],
  "renderingId": "4998",
  "iat": 1569913709,
  "exp": 1571123309
}
```

#### req.body

You can find important information in the body of the request.

<Info>
  This is particularly useful to find the context in which an action was performed via a relationship.
</Info>

```javascript theme={null}
{
  data: {
    attributes: {
      collection_name: 'users', //collection on which the action has been triggered
      values: {},
      ids: [Array], //IDs of selected records
      parent_collection_name: 'companies', //Parent collection name
      parent_collection_id: '1', //Parent collection id
      parent_association_name: 'users', //Name of the association
      all_records: false,
      all_records_subset_query: {},
      all_records_ids_excluded: [],
      smart_action_id: 'users-reset-password'
    },
    type: 'custom-action-requests'
  }
}
```

### Customizing response

#### Default success notification

Returning a 204 status code to the HTTP request of the Smart Action shows the default notification message in the browser.

On our Live Demo example, if our Smart Action `Mark as Live` route is implemented like this:

```javascript theme={null}
...

router.post('/actions/mark-as-live', permissionMiddlewareCreator.smartAction(), (req, res) => {
  // ...
  res.status(204).send();
});

...
```

We will see a success message in the browser:

<img src="https://mintcdn.com/forest-chore-open-api/TmGmEqoffYUVv4Df/images/legacy/javascript-agents/toastr-success.png?fit=max&auto=format&n=TmGmEqoffYUVv4Df&q=85&s=5d8ca41674c9e2e2658bdedb66434bf5" alt="" width="959" height="107" data-path="images/legacy/javascript-agents/toastr-success.png" />

#### Custom success notification

If we return a 200 status code with an object `{ success: '...' }` as the payload like this…

<Tabs>
  <Tab title="SQL">
    ```javascript theme={null}
    ...

    router.post('/actions/mark-as-live', permissionMiddlewareCreator.smartAction(), (req, res) => {
      // ...
      res.send({ success: 'Company is now live!' });
    });

    ...
    ```
  </Tab>

  <Tab title="Mongoose">
    ```javascript theme={null}
    ...

    router.post('/actions/mark-as-live', permissionMiddlewareCreator.smartAction(), (req, res) => {
      // ...
      res.send({ success: 'Company is now live!' });
    });

    ...
    ```
  </Tab>

  <Tab title="Rails">
    ```ruby theme={null}
    class Forest::CompaniesController < ForestLiana::SmartActionsController
      def mark_as_live
        # ...
        render json: { success: 'Company is now live!' }
      end
    end
    ```
  </Tab>
</Tabs>

… the success notification will look like this:

<img src="https://mintcdn.com/forest-chore-open-api/TmGmEqoffYUVv4Df/images/legacy/javascript-agents/toastr-success-custom.png?fit=max&auto=format&n=TmGmEqoffYUVv4Df&q=85&s=73f2fbf647cf9f9f05f8f879c4131044" alt="" width="963" height="106" data-path="images/legacy/javascript-agents/toastr-success-custom.png" />

#### Custom error notification

Finally, returning a 400 status code allows you to return errors properly.

<Tabs>
  <Tab title="SQL">
    ```javascript theme={null}
    ...

    router.post('/actions/mark-as-live', permissionMiddlewareCreator.smartAction(), (req, res) => {
      // ...
      res.status(400).send({ error: 'The company was already live!' });
    });

    ...
    ```
  </Tab>

  <Tab title="Mongoose">
    ```javascript theme={null}
    ...

    router.post('/actions/mark-as-live', permissionMiddlewareCreator.smartAction(), (req, res) => {
      // ...
      res.status(400).send({ error: 'The company was already live!' });
    });

    ...
    ```
  </Tab>

  <Tab title="Rails">
    ```ruby theme={null}
    class Forest::CompaniesController < ForestLiana::SmartActionsController
      def mark_as_live
        # ...
        render status: 400, json: { error: 'The company was already live!' }
      end
    end
    ```
  </Tab>
</Tabs>

<img src="https://mintcdn.com/forest-chore-open-api/TmGmEqoffYUVv4Df/images/legacy/javascript-agents/toastr-error.png?fit=max&auto=format&n=TmGmEqoffYUVv4Df&q=85&s=21f650152bab09145f68e25f79b31e67" alt="" width="962" height="106" data-path="images/legacy/javascript-agents/toastr-error.png" />

#### Custom HTML response

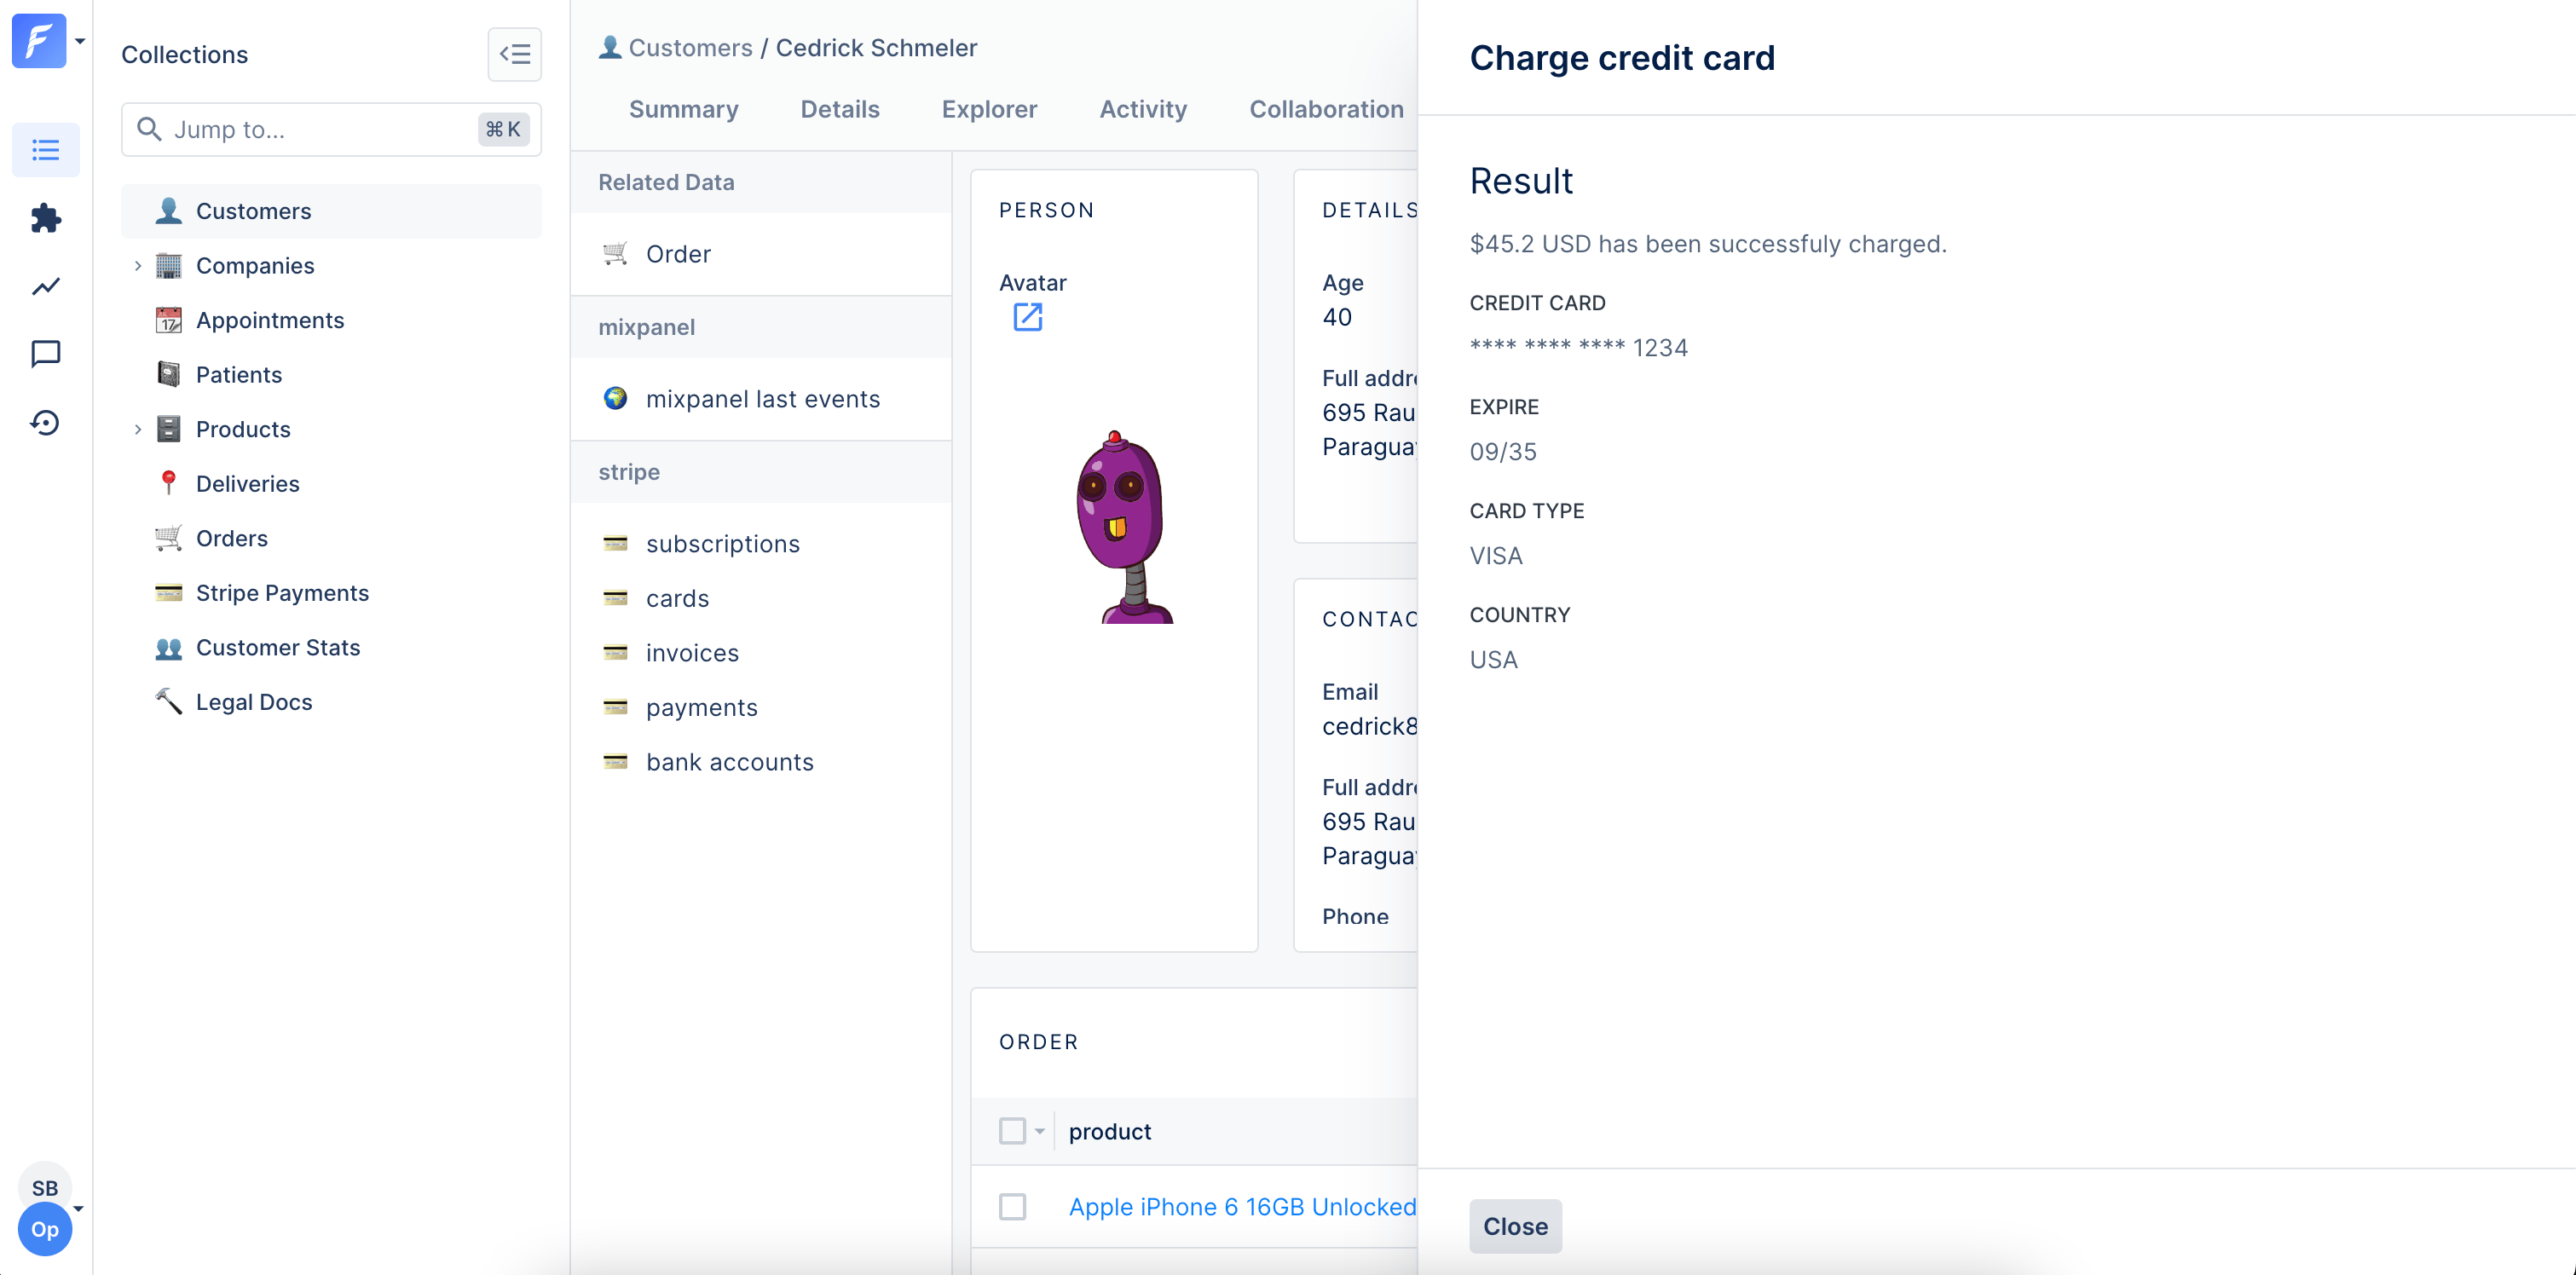
You can also return a HTML page as a response to give more feedback to the admin user who has triggered your Smart Action. To do this, you just need to return a 200 status code with an object `{ html: '...' }`.

On our Live Demo example, we’ve created a `Charge credit card` Smart Action on the Collection `customers`that returns a custom HTML response.

<Tabs>
  <Tab title="SQL">
    ```javascript theme={null}
    const { collection } = require('forest-express-sequelize');

    collection('customers', {
      actions: [
        {
          name: 'Charge credit card',
          type: 'single',
          fields: [
            {
              field: 'amount',
              isRequired: true,
              description:
                'The amount (USD) to charge the credit card. Example: 42.50',
              type: 'Number',
            },
            {
              field: 'description',
              isRequired: true,
              description:
                'Explain the reason why you want to charge manually the customer here',
              type: 'String',
            },
          ],
        },
      ],
    });
    ```

    ```javascript theme={null}
    ...
    const stripe = require('stripe')(process.env.STRIPE_SECRET_KEY);

    router.post('/actions/charge-credit-card', permissionMiddlewareCreator.smartAction(), (req, res) => {
      let customerId = req.body.data.attributes.ids[0];
      let amount = req.body.data.attributes.values.amount * 100;
      let description = req.body.data.attributes.values.description;

      return customers
        .findByPk(customerId)
        .then((customer) => {
          return stripe.charges.create({
            amount: amount,
            currency: 'usd',
            customer: customer.stripe_id,
            description: description
          });
        })
        .then((response) => {
          res.send({
            html: `
            <p class="c-clr-1-4 l-mt l-mb">\$${response.amount / 100} USD has been successfully charged.</p>
            <strong class="c-form__label--read c-clr-1-2">Credit card</strong>
            <p class="c-clr-1-4 l-mb">**** **** **** ${response.source.last4}</p>
            <strong class="c-form__label--read c-clr-1-2">Expire</strong>
            <p class="c-clr-1-4 l-mb">${response.source.exp_month}/${response.source.exp_year}</p>
            <strong class="c-form__label--read c-clr-1-2">Card type</strong>
            <p class="c-clr-1-4 l-mb">${response.source.brand}</p>
            <strong class="c-form__label--read c-clr-1-2">Country</strong>
            <p class="c-clr-1-4 l-mb">${response.source.country}</p>
            `
          });
        });
    });

    ...

    module.exports = router;
    ```
  </Tab>

  <Tab title="Mongoose">
    ```javascript theme={null}
    const { collection } = require('forest-express-mongoose');

    collection('Customer', {
      actions: [
        {
          name: 'Charge credit card',
          type: 'single',
          fields: [
            {
              field: 'amount',
              isRequired: true,
              description:
                'The amount (USD) to charge the credit card. Example: 42.50',
              type: 'Number',
            },
            {
              field: 'description',
              isRequired: true,
              description:
                'Explain the reason why you want to charge manually the customer here',
              type: 'String',
            },
          ],
        },
      ],
    });
    ```

    ```javascript theme={null}
    ...
    const stripe = require('stripe')(process.env.STRIPE_SECRET_KEY);

    router.post('/actions/charge-credit-card', (req, res) => {
      let customerId = req.body.data.attributes.ids[0];
      let amount = req.body.data.attributes.values.amount * 100;
      let description = req.body.data.attributes.values.description;

      return Customer
        .findById(customerId)
        .then((customer) => {
          return stripe.charges.create({
            amount: amount,
            currency: 'usd',
            customer: customer.stripe_id,
            description: description
          });
        })
        .then((response) => {
          res.send({
            html: `
            <p class="c-clr-1-4 l-mt l-mb">\$${response.amount / 100} USD has been successfully charged.</p>
            <strong class="c-form__label--read c-clr-1-2">Credit card</strong>
            <p class="c-clr-1-4 l-mb">**** **** **** ${response.source.last4}</p>
            <strong class="c-form__label--read c-clr-1-2">Expire</strong>
            <p class="c-clr-1-4 l-mb">${response.source.exp_month}/${response.source.exp_year}</p>
            <strong class="c-form__label--read c-clr-1-2">Card type</strong>
            <p class="c-clr-1-4 l-mb">${response.source.brand}</p>
            <strong class="c-form__label--read c-clr-1-2">Country</strong>
            <p class="c-clr-1-4 l-mb">${response.source.country}</p>
            `
          });
        });
    });

    ...

    module.exports = router;
    ```
  </Tab>

  <Tab title="Rails">
    ```ruby theme={null}
    class Forest::Customer
      include ForestLiana::Collection

      collection :Customer

      action 'Charge credit card', type: 'single', fields: [{
        field: 'amount',
        is_required: true,
        description: 'The amount (USD) to charge the credit card. Example: 42.50',
        type: 'Number'
      }, {
        field: 'description',
        is_required: true,
        description: 'Explain the reason why you want to charge manually the customer here',
        type: 'String'
      }]
    end
    ```

    ```ruby theme={null}
    Rails.application.routes.draw do
      # MUST be declared before the mount ForestLiana::Engine.
      namespace :forest do
        post '/actions/charge-credit-card' => 'customers#charge_credit_card'
      end

      mount ForestLiana::Engine => '/forest'
    end
    ```

    ```ruby theme={null}
    class Forest::CustomersController < ForestLiana::SmartActionsController
      def charge_credit_card
        customer_id = ForestLiana::ResourcesGetter.get_ids_from_request(params).first
        amount = params.dig('data', 'attributes', 'values', 'amount').to_i
        description = params.dig('data', 'attributes', 'values', 'description')

        customer = Customer.find(customer_id)

        response = Stripe::Charge.create(
          amount: amount * 100,
          currency: 'usd',
          customer: customer.stripe_id,
          description: description
        )

        render json: { html: <<EOF
    <p class="c-clr-1-4 l-mt l-mb">$#{response.amount / 100.0} USD has been successfully charged.</p>

    <strong class="c-form__label--read c-clr-1-2">Credit card</strong>
    <p class="c-clr-1-4 l-mb">**** **** **** #{response.source.last4}</p>

    <strong class="c-form__label--read c-clr-1-2">Expire</strong>
    <p class="c-clr-1-4 l-mb">#{response.source.exp_month}/#{response.source.exp_year}</p>

    <strong class="c-form__label--read c-clr-1-2">Card type</strong>
    <p class="c-clr-1-4 l-mb">#{response.source.brand}</p>

    <strong class="c-form__label--read c-clr-1-2">Country</strong>
    <p class="c-clr-1-4 l-mb">#{response.source.country}</p>
    EOF
        }
      end
    end
    ```
  </Tab>
</Tabs>

<img src="https://mintcdn.com/forest-chore-open-api/DwOJ-XBdKEod-4Pc/images/legacy/javascript-agents/actions-html-response-success.png?fit=max&auto=format&n=DwOJ-XBdKEod-4Pc&q=85&s=9bda6ca3cc33b942b874482265e1928c" alt="" width="3022" height="1496" data-path="images/legacy/javascript-agents/actions-html-response-success.png" />

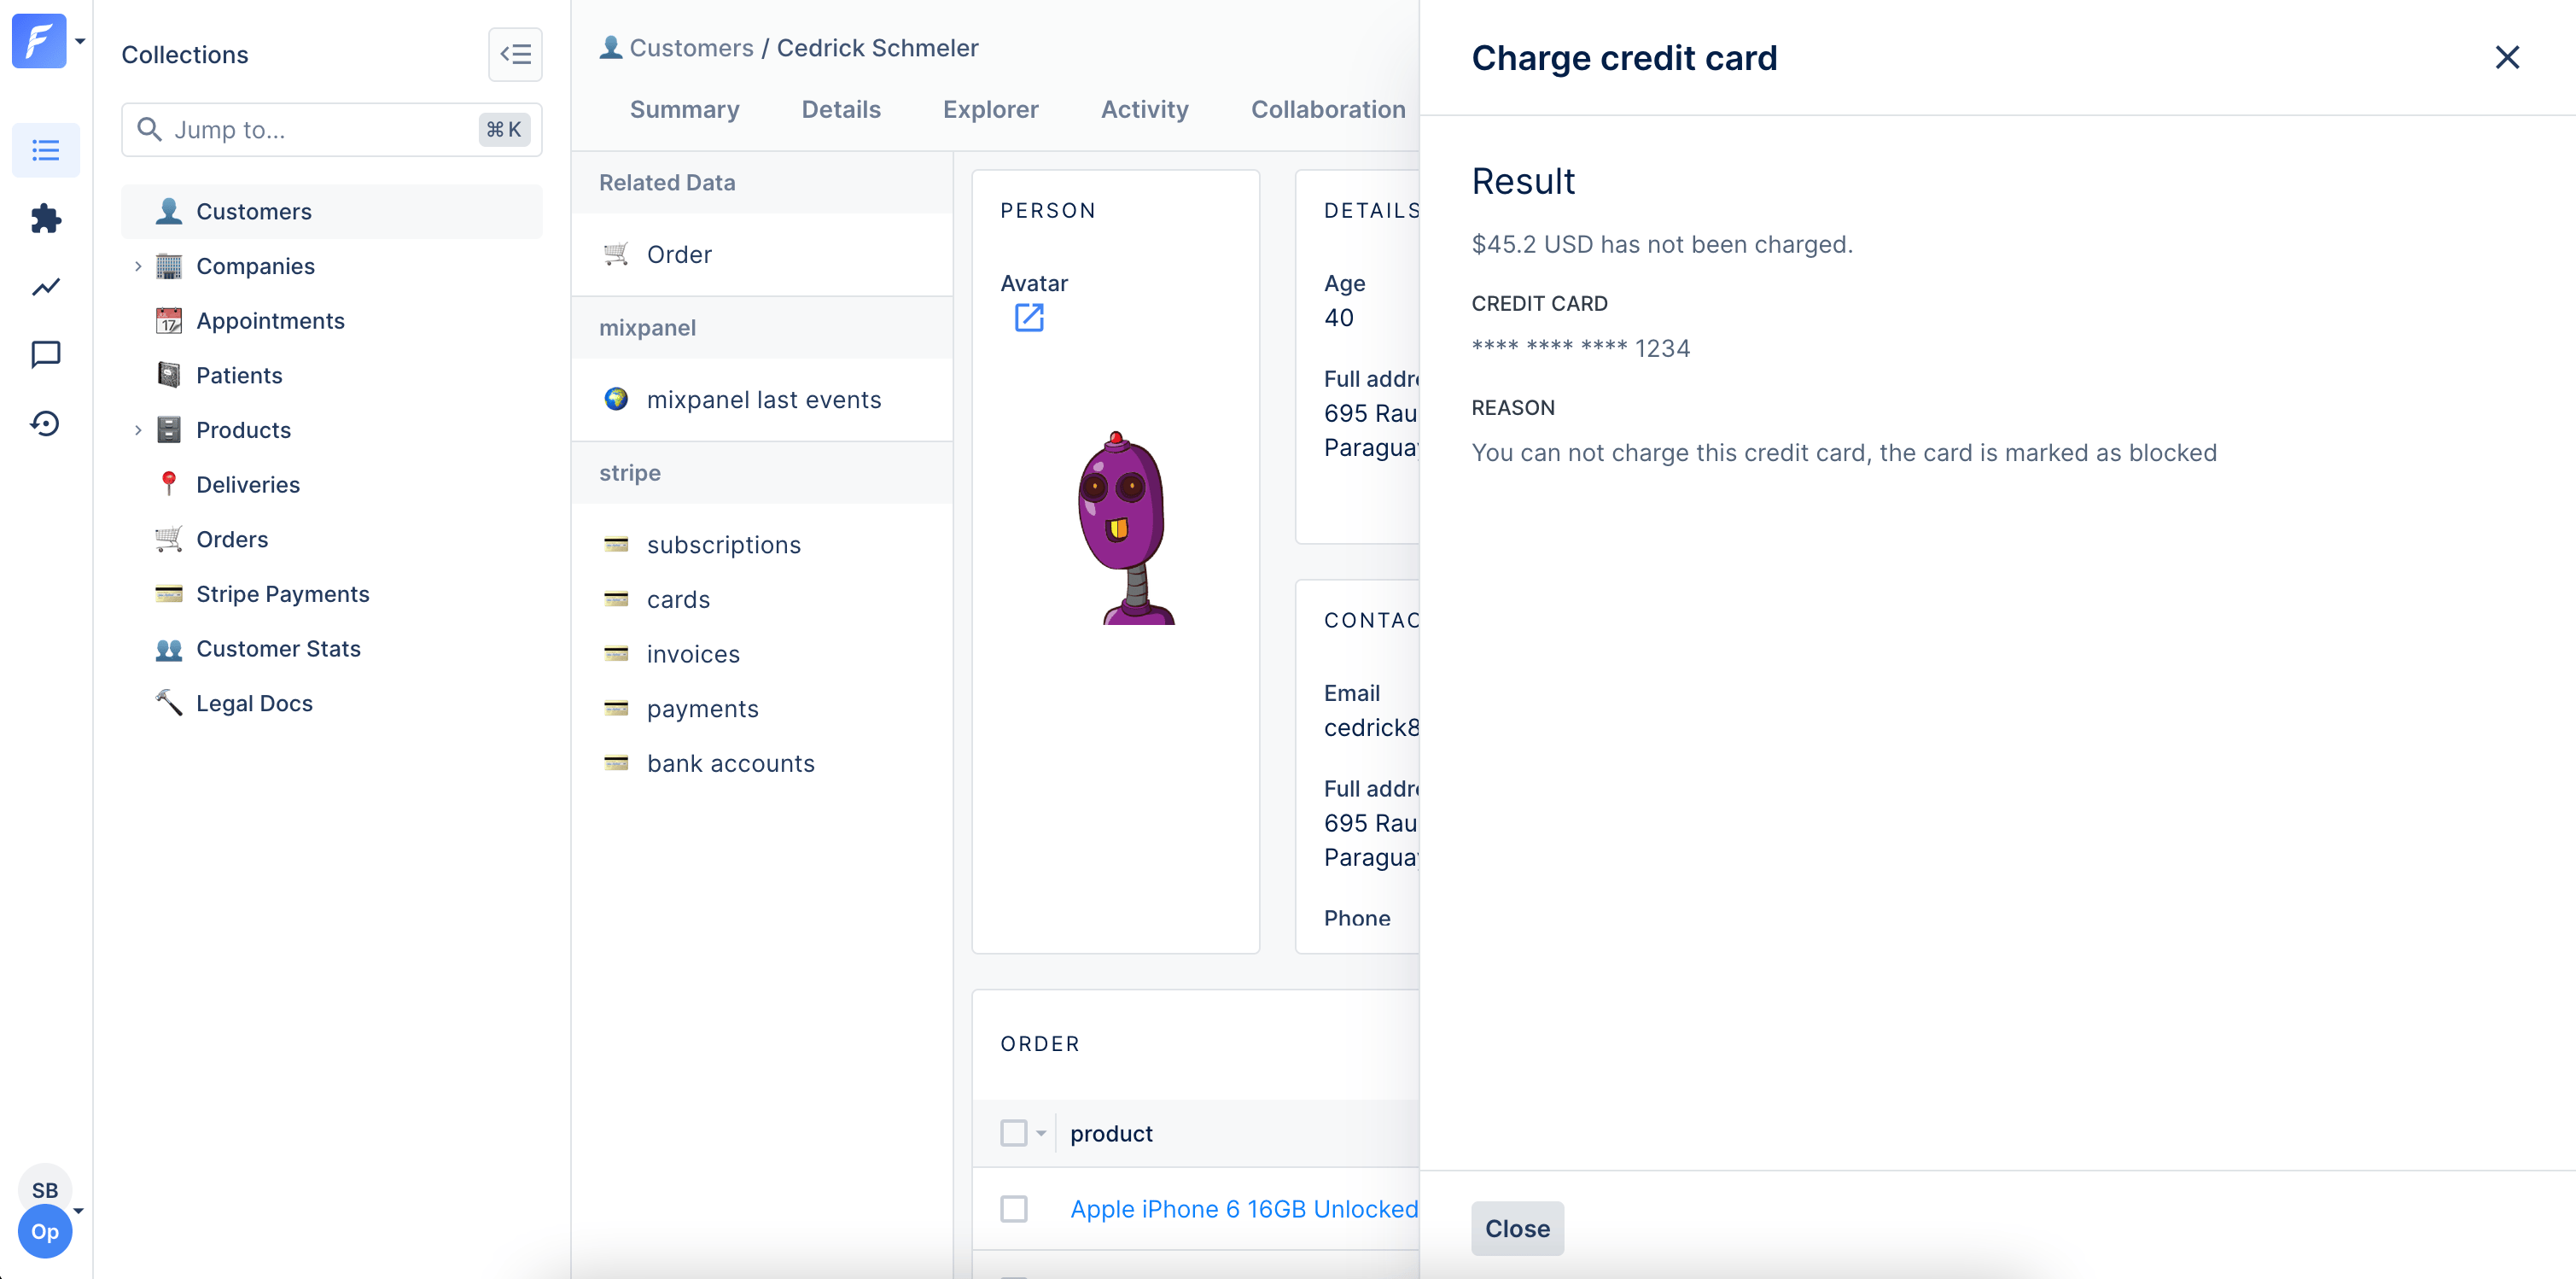
You can either respond with an HTML page in case of error. The user will be able to go back to his smart action's form by using the cross icon at the top right of the panel.

<Tabs>
  <Tab title="SQL">
    ```javascript theme={null}
    const { collection } = require('forest-express-sequelize');

    collection('customers', {
      actions: [
        {
          name: 'Charge credit card',
          type: 'single',
          fields: [
            {
              field: 'amount',
              isRequired: true,
              description:
                'The amount (USD) to charge the credit card. Example: 42.50',
              type: 'Number',
            },
            {
              field: 'description',
              isRequired: true,
              description:
                'Explain the reason why you want to charge manually the customer here',
              type: 'String',
            },
          ],
        },
      ],
    });
    ```

    ```javascript theme={null}
    ...
    const stripe = require('stripe')(process.env.STRIPE_SECRET_KEY);

    router.post('/actions/charge-credit-card', permissionMiddlewareCreator.smartAction(), (req, res) => {
      let customerId = req.body.data.attributes.ids[0];
      let amount = req.body.data.attributes.values.amount * 100;
      let description = req.body.data.attributes.values.description;

      return customers
        .findByPk(customerId)
        .then((customer) => {
          return stripe.charges.create({
            amount: amount,
            currency: 'usd',
            customer: customer.stripe_id,
            description: description
          });
        })
        .then((response) => {
          res.status(400).send({
            html: `
            <p class="c-clr-1-4 l-mt l-mb">$${response.amount / 100} USD has not been charged.</p>
            <strong class="c-form__label--read c-clr-1-2">Credit card</strong>
            <p class="c-clr-1-4 l-mb">**** **** **** ${response.source.last4}</p>
            <strong class="c-form__label--read c-clr-1-2">Reason</strong>
            <p class="c-clr-1-4 l-mb">You can not charge this credit card. The card is marked as blocked</p>
            `
          });
        });
    });

    ...

    module.exports = router;
    ```
  </Tab>

  <Tab title="Mongoose">
    ```javascript theme={null}
    const { collection } = require('forest-express-mongoose');

    collection('Customer', {
      actions: [
        {
          name: 'Charge credit card',
          type: 'single',
          fields: [
            {
              field: 'amount',
              isRequired: true,
              description:
                'The amount (USD) to charge the credit card. Example: 42.50',
              type: 'Number',
            },
            {
              field: 'description',
              isRequired: true,
              description:
                'Explain the reason why you want to charge manually the customer here',
              type: 'String',
            },
          ],
        },
      ],
    });
    ```

    ```javascript theme={null}
    ...
    const stripe = require('stripe')(process.env.STRIPE_SECRET_KEY);

    router.post('/actions/charge-credit-card', (req, res) => {
      let customerId = req.body.data.attributes.ids[0];
      let amount = req.body.data.attributes.values.amount * 100;
      let description = req.body.data.attributes.values.description;

      return Customer
        .findById(customerId)
        .then((customer) => {
          return stripe.charges.create({
            amount: amount,
            currency: 'usd',
            customer: customer.stripe_id,
            description: description
          });
        })
        .then((response) => {
          res.status(400).send({
            html: `
            <p class="c-clr-1-4 l-mt l-mb">\$${response.amount / 100} USD has not been charged.</p>
            <strong class="c-form__label--read c-clr-1-2">Credit card</strong>
            <p class="c-clr-1-4 l-mb">**** **** **** ${record.source.last4}</p>
            <strong class="c-form__label--read c-clr-1-2">Reason</strong>
            <p class="c-clr-1-4 l-mb">You can not charge this credit card. The card is marked as blocked</p>
            `
          });
        });
    });

    ...

    module.exports = router;
    ```
  </Tab>

  <Tab title="Rails">
    ```ruby theme={null}
    class Forest::Customer
      include ForestLiana::Collection

      collection :Customer

      action 'Charge credit card', type: 'single', fields: [{
        field: 'amount',
        is_required: true,
        description: 'The amount (USD) to charge the credit card. Example: 42.50',
        type: 'Number'
      }, {
        field: 'description',
        is_required: true,
        description: 'Explain the reason why you want to charge manually the customer here',
        type: 'String'
      }]
    end
    ```

    ```ruby theme={null}
    Rails.application.routes.draw do
      # MUST be declared before the mount ForestLiana::Engine.
      namespace :forest do
        post '/actions/charge-credit-card' => 'customers#charge_credit_card'
      end

      mount ForestLiana::Engine => '/forest'
    end
    ```

    ```ruby title="/app/controllers/forest/customers_controller.rb" theme={null}
    class Forest::CustomersController &#x3C; ForestLiana::SmartActionsController
      def charge_credit_card
        customer_id = ForestLiana::ResourcesGetter.get_ids_from_request(params, forest_user).first
        amount = params.dig('data', 'attributes', 'values', 'amount').to_i
        description = params.dig('data', 'attributes', 'values', 'description')

        customer = Customer.find(customer_id)

        response = Stripe::Charge.create(
          amount: amount * 100,
          currency: 'usd',
          customer: customer.stripe_id,
          description: description
        )

        render status: 400, json: {
          html: &#x3C;&#x3C;EOF
          &#x3C;p class="c-clr-1-4 l-mt l-mb">\$#{record.amount / 100} USD has not been charged.&#x3C;/p>
          &#x3C;strong class="c-form__label--read c-clr-1-2">Credit card&#x3C;/strong>
          &#x3C;p class="c-clr-1-4 l-mb">**** **** **** #{record.source.last4}&#x3C;/p>
          &#x3C;strong class="c-form__label--read c-clr-1-2">Reason&#x3C;/strong>
          &#x3C;p class="c-clr-1-4 l-mb">You can not charge this credit card. The card is marked as blocked&#x3C;/p>
          EOF
        }
      end
    end

    ```
  </Tab>
</Tabs>

<img src="https://mintcdn.com/forest-chore-open-api/DwOJ-XBdKEod-4Pc/images/legacy/javascript-agents/actions-html-response-error.png?fit=max&auto=format&n=DwOJ-XBdKEod-4Pc&q=85&s=79322ca7d5f392791362184389844412" alt="" width="3018" height="1498" data-path="images/legacy/javascript-agents/actions-html-response-error.png" />

### Setting up a webhook

After a smart action you can set up a HTTP (or HTTPS) callback - a webhook - to forward information to other applications.\
\
To set up a webhook all you have to do is to add a `webhook`object in the response of your action.

<Tabs>
  <Tab title="SQL">
    ```javascript theme={null}
    response.send({
      webhook: {
        // This is the object that will be used to fire http calls.
        url: 'http://my-company-name', // The url of the company providing the service.
        method: 'POST', // The method you would like to use (typically a POST).
        headers: {}, // You can add some headers if needed (you can remove it).
        body: {
          // A body to send to the url (only JSON supported).
          adminToken: 'your-admin-token',
        },
      },
    });
    ```
  </Tab>

  <Tab title="Mongoose">
    ```javascript theme={null}
    response.send({
      webhook: {
        // This is the object that will be used to fire http calls.
        url: 'http://my-company-name', // The url of the company providing the service.
        method: 'POST', // The method you would like to use (typically a POST).
        headers: {}, // You can add some headers if needed (you can remove it).
        body: {
          // A body to send to the url (only JSON supported).
          adminToken: 'your-admin-token',
        },
      },
    });
    ```
  </Tab>

  <Tab title="Rails">
    ```ruby theme={null}
    render json: {
      webhook: { # This is the object that will be used to fire http calls.
        url: 'http://my-company-name', # The url of the company providing the service.
        method: 'POST', # The method you would like to use (typically a POST).
        headers: {}, # You can add some headers if needed (you can remove it).
        body: { # A body to send to the url (only JSON supported).
          adminToken: 'your-admin-token',
        }
      }
    }
    ```
  </Tab>

  <Tab title="Django">
    ```python theme={null}
    from django_forest.utils.collection import Collection
    from app.models import Customer

    class CustomerForest(Collection):
        def load(self):
            self.actions = [{
                'name': 'Generate invoice',
                'download': True
            }]

    Collection.register(CustomerForest, Customer)
    ```
  </Tab>

  <Tab title="Laravel">
    On our Live Demo, the collection `Customer` has a Smart Action `Generate invoice`. In this use case, we want to download the generated PDF invoice after clicking on the action. To indicate a Smart Action returns something to download, you have to enable the option `download`.

    <Info>
      Want to upload your files to Amazon S3? Check out this this [Woodshop tutorial](https://docs.forestadmin.com/woodshop/how-tos/upload-files-to-s3).
    </Info>
  </Tab>
</Tabs>

### Refreshing your related data

If you want to create an action accessible from the details or the summary view of a record involving related data, this section may interest you.

In the example below, the “Add new transaction” action is accessible from the summary view. This action creates a new transaction and automatically refreshes the “Emitted transactions” related data section to see the new transaction.

<Tabs>
  <Tab title="SQL">
    Below is the sample code. We use faker to generate random data in our example. Remember to install it if you wish to use it (`npm install faker`).

    ```javascript theme={null}
    const { collection } = require('forest-express-sequelize');

    collection('companies', {
      actions: [
        {
          name: 'Add new transaction',
          description: 'Name of the company who will receive the transaction.',
          fields: [
            {
              field: 'Beneficiary company',
              description: 'Name of the company who will receive the transaction.',
              reference: 'companies.id',
            },
            {
              field: 'Amount',
              type: 'Number',
            },
          ],
        },
      ],
    });
    ```

    ```javascript theme={null}
    ...
    const faker = require('faker');

    router.post('/actions/add-new-transaction', permissionMiddlewareCreator.smartAction(),
      (req, res) => {
        let emitterCompanyId = req.body.data.attributes.ids[0]
        let beneficiaryCompanyId = req.body.data.attributes.values['Beneficiary company']
        let amount = req.body.data.attributes.values['Amount']

        return transactions
          .create({
            emitter_company_id: emitterCompanyId,
            beneficiary_company_id: beneficiaryCompanyId,
            beneficiary_iban: faker.finance.iban(),
            emitter_iban: faker.finance.iban(),
            vat_amount: faker.finance.amount(500, 10000, 0),
            fee_amount: faker.finance.amount(500, 10000, 0),
            status: ['to_validate', 'validated', 'rejected'].sample,
            note: faker.lorem.sentences(),
            amount: amount,
            emitter_bic: faker.finance.bic(),
            beneficiary_bic: faker.finance.bic()
          })
          .then(() => {
    	    // the code below automatically refresh the related data
        	// 'emitted_transactions' on the Companies' Summary View
        	// after submitting the Smart action form.
            res.send({
              success: 'New transaction emitted',
              refresh: { relationships: ['emitted_transactions'] },
            });
          });
    });
    ```
  </Tab>

  <Tab title="Mongoose">
    Below is the sample code. We use faker to generate random data in our example. Remember to install it if you wish to use it (`npm install faker`).

    ```javascript theme={null}
    const { collection } = require('forest-express-mongoose');

    collection('Company', {
      actions: [
        {
          name: 'Add new transaction',
          description: 'Name of the company who will receive the transaction.',
          fields: [
            {
              field: 'Beneficiary company',
              description: 'Name of the company who will receive the transaction.',
              reference: 'Company',
            },
            {
              field: 'Amount',
              type: 'Number',
            },
          ],
        },
      ],
    });
    ```

    ```javascript theme={null}
    const express = require('express');
    const router = express.Router();
    const Liana = require('forest-express-mongoose');
    const Transaction = require('../models/transactions');
    const faker = require('faker');
    // ...

    router.post(
      '/actions/add-new-transaction',
      Liana.ensureAuthenticated,
      (req, res) => {
        let emitterCompanyId = req.body.data.attributes.ids[0];
        let beneficiaryCompanyId =
          req.body.data.attributes.values['Beneficiary company'];
        let amount = req.body.data.attributes.values['Amount'];

        return Transaction.create({
          emitter_company_id: emitterCompanyId,
          beneficiary_company_id: beneficiaryCompanyId,
          beneficiary_iban: faker.finance.iban(),
          emitter_iban: faker.finance.iban(),
          vat_amount: faker.finance.amount(500, 10000, 0),
          fee_amount: faker.finance.amount(500, 10000, 0),
          status: ['to_validate', 'validated', 'rejected'].sample,
          note: faker.lorem.sentences(),
          amount: amount,
          emitter_bic: faker.finance.bic(),
          beneficiary_bic: faker.finance.bic(),
        }).then(() => {
          // the code below automatically refresh the related data
          // 'emitted_transactions' on the Companies' Summary View
          // after submitting the Smart action form.
          res.send({
            success: 'New transaction emitted',
            refresh: { relationships: ['emitted_transactions'] },
          });
        });
      }
    );
    ```
  </Tab>

  <Tab title="Rails">
    Below is the sample code. We use the `gem 'faker'` to easily generate fake data. Remember to add this gem to your `Gemfile` and install it (`bundle install`) if you wish to use it.

    ```ruby theme={null}
    class Forest::Company
      include ForestLiana::Collection

      collection :Company
      # ...

      action 'Add new transaction', fields: [{
        field: 'Beneficiary company',
        description: 'Name of the company who will receive the transaction.',
        reference: 'Company.id'
      }, {
        field: 'Amount',
        type: 'Number'
      }]

      # ...
    end
    ```

    ```ruby theme={null}
    class Forest::CompaniesController < ForestLiana::SmartActionsController
      # ...

      def add_new_transaction
        attrs = params.dig('data','attributes', 'values')
        beneficiary_company_id = attrs['Beneficiary company']
        emitter_company_id = ForestLiana::ResourcesGetter.get_ids_from_request(params, forest_user).first
        amount = attrs['Amount']
        Transaction.create!(
          emitter_company_id: emitter_company_id,
          beneficiary_company_id: beneficiary_company_id,
          beneficiary_iban: Faker::Code.imei,
          emitter_iban: Faker::Code.imei,
          vat_amount: Faker::Number.number(4),
          fee_amount: Faker::Number.number(4),
          status: ['to_validate', 'validated', 'rejected'].sample,
          note: Faker::Lorem.paragraph,
          amount: amount,
          emitter_bic: Faker::Code.nric,
          beneficiary_bic: Faker::Code.nric
        )

        # the code below automatically refresh the related data
        # 'emitted_transactions' on the Companies' Summary View
        # after submitting the Smart action form.
        render json: {
          success: 'New transaction emitted',
          refresh: { relationships: ['emitted_transactions'] },
        }
      end
    end
    ```

    ```ruby theme={null}
    Rails.application.routes.draw do
      # MUST be declared before the mount ForestLiana::Engine.
      namespace :forest do
        # ...
        post '/actions/add-new-transaction' => 'companies#add_new_transaction'
        # ...
      end

      mount ForestLiana::Engine => '/forest'
      # For details on the DSL available within this file, see http://guides.rubyonrails.org/routing.html
    end
    ```
  </Tab>

  <Tab title="Django">
    Below is the sample code. We use the python Faker package to easily generate fake data. Remember to add this package to your `requirements.txt` and install it if you wish to use it.
  </Tab>

  <Tab title="Laravel">
    Below is the sample code. We use the Faker package to easily generate fake data. Remember to add this package to your `composer.json` and install it if you wish to use it.
  </Tab>
</Tabs>

### Redirecting to a different page on success

To streamline your operation workflow, it could make sense to redirect to another page after a Smart action was successfully executed.\
\
It is possible using the `redirectTo` property.\
\
The redirection works both for **internal** (`*.forestadmin.com` pages) and **external** links.

<Info>
  **External** links will open in a new tab.
</Info>

Here's a working example for both cases:

<Tabs>
  <Tab title="SQL">
    ```javascript theme={null}
    const { collection } = require('forest-express-sequelize');

    collection('models', {
      actions: [
        {
          name: 'Return and track',
        },
        {
          name: 'Show some activity',
        },
      ],
    });
    ```

    ```javascript theme={null}
    ...

    // External redirection
    router.post('/actions/return-and-track', permissionMiddlewareCreator.smartAction(),
      (req, res) => {
        res.send({
          success: 'Return initiated successfully.',
          redirectTo: 'https://www.royalmail.com/portal/rm/track?trackNumber=ZW924750388GB',
        });
      }
    );

    // Internal redirection
    router.post('/actions/show-some-activity', permissionMiddlewareCreator.smartAction(),
      (req, res) => {
        res.send({
          success: 'Navigated to the activity view.',
          redirectTo: '/MyProject/MyEnvironment/MyTeam/data/20/index/record/20/108/activity',
        });
      }
    );

    ...

    module.exports = router;
    ```
  </Tab>

  <Tab title="Mongoose">
    ```javascript theme={null}
    const { collection } = require('forest-express-mongoose');

    collection('models', {
      actions: [
        {
          name: 'Initiate return and display tracking',
        },
        {
          name: 'Show some activity',
        },
      ],
    });
    ```

    ```javascript theme={null}
    ...

    // External redirection
    router.post('/actions/return-and-track', Liana.ensureAuthenticated,
      (req, res) => {
        res.send({
          success: 'Return initiated successfully.',
          redirectTo: 'https://www.royalmail.com/portal/rm/track?trackNumber=ZW924750388GB',
        });
      }
    );

    // Internal redirection
    router.post('/actions/show-some-activity', Liana.ensureAuthenticated,
      (req, res) => {
        res.send({
          success: 'Navigated to the activity view.',
          redirectTo: '/1/data/20/index/record/20/108/activity/preview',
        });
      }
    );

    ...

    module.exports = router;
    ```
  </Tab>

  <Tab title="Rails">
    ```ruby theme={null}
    class Forest::Company
      include ForestLiana::Collection

      collection :Company

      action 'Return and track'
      action 'Show some activity'
    end
    ```

    ```ruby theme={null}
    ...

    namespace :forest do
      post '/actions/return-and-track' => 'company#redirect_externally'
      post '/actions/show-some-activity' => 'company#redirect_internally'
    end

    ...
    ```

    ```ruby theme={null}
    ...

    def redirect_externally
      # External redirection
      render json: {
        success: 'Return initiated successfully.',
        redirectTo: 'https://www.royalmail.com/portal/rm/track?trackNumber=ZW924750388GB',
      }
    end

    def redirect_internally
      # Internal redirection
      render json: {
        success: 'Return initiated successfully.',
        redirectTo: '/MyProject/MyEnvironment/MyTeam/data/20/index/record/20/108/activity',
      }
    end

    ...
    ```
  </Tab>
</Tabs>

<Warning>
  Your **external** links must use the `http` or `https` protocol.
</Warning>

### Enable/Disable a Smart Action according to the state of a record

Sometimes, your Smart Action only makes sense depending on the state of your records. On our Live Demo, it does not make any sense to enable the `Mark as Live` Smart Action on the `companies` collection if the company is already live, right? This is configured from the collection's Smart Action settings.

### Restrict a smart action to specific roles

When using Forest collaboratively with clear roles defined it becomes relevant to restrict a smart action only to a select few. This functionality is accessible through Smart Actions Permissions in the Role section of your Project Settings.

### Require approval for a Smart action

Critical actions for your business may need approval before being processed. You can require approval per role from the *Roles* tab of your Project Settings; approval requests are then reviewed from the Collaboration menu.

<Check>
  Want to go further with Smart Actions? Read the next page to discover how to make your Smart Actions even more powerful with **Forms**!
</Check>